Virtual events are sustainable, inclusive, and cost-effective alternatives to traditional in-person events. Our guide is filled with best practices and recommendations to help you host and manage a successful virtual experience with Zoom Events.
The Ultimate Guide for Event Hosts and Virtual Presenters

In this guide
- 01 Best practices for your virtual event - Jumplink to Best practices for your virtual event
- 02 Let’s get started (hosts) - Jumplink to Let’s get started (hosts)
- 03 The pre-event countdown (hosts/presenters) - Jumplink to The pre-event countdown (hosts/presenters)
- 04 Presenting during an event (hosts/presenters) - Jumplink to Presenting during an event (hosts/presenters)
- 05 Monitoring your webinars - Jumplink to Monitoring your webinars
- 06 Maximize your recordings for the long-term - Jumplink to Maximize your recordings for the long-term
- 07 Zoom is here to help - Jumplink to Zoom is here to help
Share this post
How to turn your virtual event into a memorable experience
The pandemic catapulted virtual event platforms into the mainstream with an unprecedented demand for online meetings, webinars, and networking events. Virtual events, however, existed long before the seismic shift to remote life. More than just an alternative to in-person events, virtual experiences are sustainable, inclusive events that reduce travel expenses and appeal to broader, more diverse audiences. These benefits, combined with advanced data and analytics, make it easy to see why virtual events are an integral part of any modern event marketing strategy.
Hosting a virtual event mirrors many of the same responsibilities of a traditional in-person event, yet also requires using innovative technologies to create a memorable experience for every attendee. Whether you’re a first-timer or a seasoned event professional, our Zoom Events Guide for Event Hosts and Virtual Presenters will help you feel better prepared to execute a successful virtual event.
You’ll learn tips and recommendations for:
- Virtual event best practices
- Pre-event set-up
- Presenting tips
- Monitoring and managing events
- Engaging with Zoom support
*NOTE: In this guide, virtual presenters are defined as the person speaking on camera or moderating between speakers during an event. The host is the facilitator or person managing the event itself with the Zoom Events platform. In some cases, these roles may overlap or share duties based on your organization.
Welcome to Zoom Events
Welcome to Zoom Events! Our virtual event platform lets you host events of all sizes, including single-session, multi-session, multi-day, and multi-track events. It combines the trusted Zoom Meetings and Zoom Webinars technology you know and love, and is designed with dedicated event hubs, robust registration and ticketing options, and attendee networking options for all of your events (public or private, free or paid). Zoom Events is easy to use so you can focus on creating a memorable, impactful experience without the hassle of complicated technology.
Best practices for your virtual event

Hosting a virtual event and presenting to a remote audience may feel a little nerve-wracking if it’s your first time. But it doesn’t have to be. Here are a few best practices to keep in mind as you plan for the big day.
1. Lights, camera, action (presenters)Just because you’re speaking to a remote audience doesn’t mean they should struggle to see or hear you. Poor lighting and glitchy audio can cause attendees to quickly bail on a virtual event. Position the light so it’s facing you to eliminate shadows and ensure your viewers can see you.
Our Zoom Events consultants manager loves working with Lume Edge, Brightline, El Gato, or Litra lighting.
For a clear audio experience, we recommend using a quality microphone instead of relying on the built-in audio of your computer. Although Zoom Meetings and Zoom Webinars can minimize background noise when speaking, it’s best to soundproof your surroundings as much as possible before presenting.
And finally, look into the camera. It’s not easy to make eye contact behind a computer, but looking into the camera, instead of at the faces on your screen, will instantly level-up your presentation’s impact.
Attach a sticky note to your monitor at the exact spot where you should focus when talking to keep your eyes in the right place.
2. Write a script (presenters)It’s always a good idea to write a script, no matter how familiar you are with a topic. This gives your host an idea as to the length of your presentation and is especially helpful if they’re managing any visual aids, preparing for the next speaker, or need to make a sudden adjustment. At a minimum, having a bulleted outline can reduce anxiety for everyone and lead to a smoother session.
3. Practice makes perfect (presenters and hosts)As the adage says, practice makes perfect. We recommend practicing a minimum of 24 hours in advance. Ideally, you should rehearse your event on the same devices you plan to use during the event. And don’t wait until the day of your event to learn new technology or software features. Zoom Events is filled with tools that augment the user and attendee experience but require some advance setup. Try to mirror your event as much as possible during your rehearsals to glean insight into any last-minute needs that may arise.
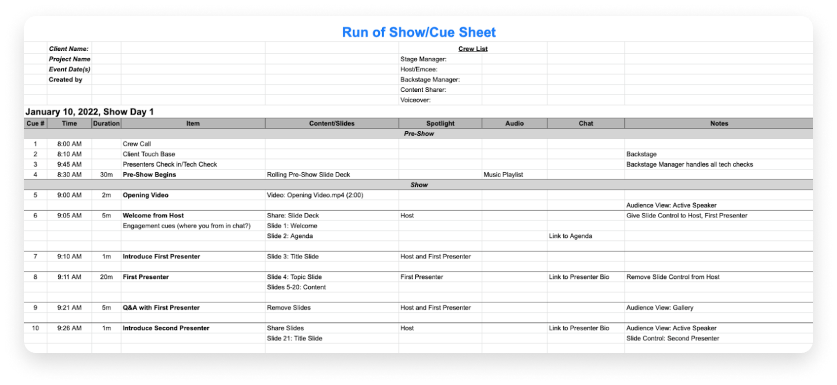
4. Develop a run of show (hosts)Sometimes thought of as a cue sheet or cue-to-cue, the run of show is the sequence of actions during an event and is a master document for stakeholders to follow. More than an agenda, the run of show is a critical tool to help you stay organized and reduce the anxiety that can accompany hosting an event. The details in your run of show will vary based on the complexity of your event, but at a minimum, it’s helpful to include these elements:
-
- Contact list (presenters, speakers, A/V teams, contractors, catering)
- Event flow (order of speakers, locations (virtual conference rooms, remote offices, or on-site meeting spaces))
- Technical elements (technical cues for music, slideshows, videos)
- Timing cues (speakers, sessions, breaks, opening/closing)
We recommend creating a template that can be easily edited for future events.
5. Prepare for audience engagement in advance (hosts and presenters)If you plan to have a Q&A session or want to chat with your audience, think about how you’ll engage with them. For highly attended events, it’s helpful to have someone other than the speaker manage the questions that come through the chat or Q&A function. We also recommend asking a few colleagues to attend your event with questions prepared in advance to jumpstart the conversation.If you’re speaking at a hybrid event, don’t forget about the virtual audience. Remote attendees will feel more engaged if you remember to address their questions and speak directly to them. To avoid people talking over one another, encourage attendees to use the Zoom Webinars Reactions feature, which lets virtual users respond to content with favorable emojis.
For hybrid events, consider having a monitor positioned near the speaker that displays the remote attendees for the live audience to see and interact with.
Let’s get started (hosts)

Whether you’re hosting a conference, webinar, expo booth, or meeting, there are a few technical elements you’ll want to consider or set up before you begin.
- Minimum system requirements: Zoom mobile client and desktop users will need to use Windows 5.7.6 or higher or MacOS 5.7.6 or higher for an optimal experience. Prior to your event, update all your software applications and operating systems to the most recent versions to streamline the use of any complementary assets (video, slides, etc.). If you’re hosting a large event, double check your internet speed/connection and bandwidth availability to ensure attendees won’t experience delays or lags with your audio/video.
- Backup internet/hardware: Whenever possible, hardwire your computer and devices directly into your internet router for the fastest and most stable internet connection. Wi-Fi isn’t always reliable, so prepare a contingency plan in case you lose internet and/or power (cell phone hotspots are an excellent quick-fix alternative).
- Feed options: Depending on the size and complexity of your event, you may want to use additional tools to elevate the experience. Webcams are the most common way to share a video feed, but external DSLR cameras with HDMI capture cards also deliver a professional, live-streaming experience.
-
- Virtual mixing and streaming software can integrate with Zoom to level-up your production value. If this feels intimidating, virtual mixing applications are designed to accommodate all skill levels, from novices to experienced A/V professionals, and can be used to manage the entire feed or complement your workflows. They are compatible with single and multi-camera events and enhance live-streaming content with powerful audiovisual workflows, dynamic images, and custom animations.
If you’re using virtual mixing and streaming software, our Zoom Events consultant manager recommends VM Mix and OBS Studio to elevate the quality of your live feed. And, if you need a virtual camera app, check out the SnapCam-Zoom integration.
-
- Virtual camera applications: If you want to inject some fun into your livestream feed, virtual camera apps offer augmented reality filters, lenses, and enhanced visual aids. Once you download a camera app, connect it to your desktop (or external) microphone and camera. Open the Zoom desktop client and select the gear icon>video option. There, you can toggle between your new camera app and current camera input.
- Lighting: As a reminder, adequate lighting is crucial for a successful event. If you plan to host from a conference space, pay attention to overhead light that can cause dark shadows, especially if your speaker will be walking around the room. When booking your space, look at the room’s brightness both in the daytime and evening, and determine whether or not you can adjust the lighting intensity. If hosting from a personal computer, try to position the device near a natural light source and use external lighting, such as soft ring lights and panel lights, that face the presenter. If presenting from a home office and/or personal device, we also recommend that presenters face a window whenever possible versus having a window in their background.
- Shot framing: For the best video experience, frame your shot with a close-up view of the speaker from their shoulders to the top of their head. Adjust the camera to eye level or slightly higher so the speaker isn’t hunching over a laptop or staring up. This may require repositioning your webcam to a different monitor, standing, or using an external camera and tripod. As you’re preparing, remember the rule of thirds and try to fill two-thirds of the frame with your subject and leave some breathing room on top.While they are not the focus, backgrounds also play a factor when framing your shot and need to be free of clutter. Participants want to see more of the speaker and less of their surroundings.
- Virtual backgrounds: Zoom’s virtual backgrounds are a fun feature to showcase your personality, celebrate a holiday, or incorporate your company branding. Pick an image from our library or create your own. Just like other virtual camera apps, Zoom Meetings and Zoom Webinars also provide filters, stickers, and avatars to layer on top of your presentation.To change your background, download an image (GIF, JPG/JPEG, PNG with 16:9 ratio and 1280×720 pixels or higher) or video (MP4 or MOV 480×360 pixels and no more than 1920×1020) of your choice and access it from the Zoom desktop client settings menu under Preferences>Background & Filters>Virtual Backgrounds. From there, you’ll see the option to upload your image or choose from our preloaded images.
- Webinar branding: Just because your event is virtual doesn’t mean your brand has to go unnoticed. Zoom Webinars Session Branding allows you to customize your registration pages with your preferred color scheme, title, banner, logo, images, name tags, and bios of presenters. When combined with a custom virtual background, your brand will be on full display throughout the event.
- Zoom Rooms: If you’re hosting a hybrid event, Zoom Rooms easily integrate with Zoom Events to create a truly hybrid presentation space. As a modern conference room experience, Zoom Rooms unite in-person and remote participants by allowing them to share content and interact with one another regardless of location. Event speakers can present from a large conference room, behind a podium, or at home, and deploy Zoom-certified hardware and appliances to deliver a professional event experience.
The pre-event countdown (hosts/presenters)

Hang out backstage: Minimize the stress for your presenters with Zoom Webinars Backstage, a virtual green room for presenters to hang out when not actively speaking. It’s open before, during, and after an event and is the ideal place to review audio and video connections, presentation content, communicate with other panelists, answer attendee questions without being on camera, or practice screen sharing.
Don’t wait until the big day, however, to access Backstage for the first time. We strongly recommend rehearsing your event within the actual session you are presenting to familiarize yourself with the available settings. Backstage allows you to practice in the practice area, the session itself, and/or the Waiting Room. Hosts and co-hosts as well as alt-hosts, speakers, and sponsors, can access your Zoom Event Lobby to view these practice sessions at any time once your event is published.
Set up Session Branding: In addition to the aforementioned logos, colors, and visual branding elements, Zoom Webinars Session Branding also helps you add creative elements to your speakers’ appearance. Before the event, spend some time exploring the available options to decide how you want your panelists or presenters to appear to attendees. To enable Session Branding, sign in to the Zoom Web portal and navigate to the Account Management>Account Settings and locate the Meetings tab. There, you’ll see the In Meeting (Advanced) tab, where you can enable/disable Webinar Session Branding. Once this feature is enabled, you can:
- Customize the wallpaper behind video tiles and shared content
- Give speakers unique virtual backgrounds
- Apply digital name tags with your brand colors
A few things to keep in mind with Session Branding:
- Remind your attendees and panelists to update to the latest version of Zoom in order to receive an assigned virtual background or name tag (panelists) or view pre-set wallpaper.
- Make sure your virtual background and nametags coordinate with the wallpaper so your attendees are visually appealing in both gallery and speaker view.
- You can arrange video tiles in a custom gallery view order.
Presenting during an event (hosts/presenters)

Zoom Webinars and Zoom Meetings are designed to be engaging and interactive experiences with an abundance of features that make virtual event memorable. We recommend using the following tools to streamline the experience for both attendees and hosts.
Presenter management
- Spotlight: The Spotlight tool is helpful for highlighting a specific participant (such as a keynote speakers) and will display the video feeds of the primary active speakers you choose for attendees to see. You can also spotlight yourself as the speaker and switch throughout the event. This feature can be found in both Zoom Meetings and Zoom Webinars by hovering over the video of the person you want to spotlight and clicking on the three ellipses to locate the spotlight feature.
- Muting: As a host, you can minimize background noise with the mute/unmute all participants option. With their consent, hosts can mute everyone at once versus stopping to ask everyone to mute themselves or singling out an attendee. From your Zoom toolbar, access the Participants>More tab to mute/unmute everyone. Once you’re signed in to your event, hover over a specific participant’s name to mute/unmute or ask them to unmute themselves. Don’t forget to remind everyone to stay muted until it’s their time to speak.
- Backstage to mainstage: We highly recommend enabling Zoom Webinars Backstage and practice using this feature with all of your panelists ahead of time. Note: you must have Admin status to edit the account settings from the Zoom Web Portal. Locate the Meetings tab and access the In-Meetings (Advanced) section to enable Webinar Backstage for everyone.Once Backstage is enabled, panelists will join the backstage area automatically, even if the webinar is not open to attendees. Hosts can move participants back and forth between live sessions or let panelists hang out after the webinar concludes for debriefs. Panelists who are Backstage can watch the live session so they’ll hear their cue to join or if they’re waiting for the webinar to begin, they’ll see a clear OFF AIR image to know that no attendees are actively viewing the webinar yet.For moderators, production assistants, or other behind-the-scenes personnel, Backstage allows them to remain off screen but interact and chat with panelists, access Polls/Q&As and move around the live event. To grant participants’ access, visit the Participants>Panelists tabs.
Content management
- Video playback: If you plan to show a video during your event, use the built-in video player for shared content instead of sharing your screen. This provides a more stable and professional viewing experience that doesn’t affect the resolution quality of your video. Sharing video via the Zoom playback feature encodes video directly from the file and minimizes the impact on your CPU usage, screen resolution, graphics card, and operating systems, which can downgrade your video quality.Once you’re signed into Zoom Meetings, click the Share Screen button in the meeting toolbar. From there, you’ll switch to the Advanced tab and select Video. Simply find the video you wish to share and click “open” to begin watching.
- Slide sharing: The slide control tool allows presenters to switch between slides at their leisure without depending on a host to maneuver their content assets. With just a few clicks, hosts can enable or disable access to one user, a specific group, or the entire attendee base.To set this feature for all users, use the Zoom Web Portal to sign in to Account Management>Settings. From there, navigate to the Meetings tab, then In Meeting>Slide Control to turn slide control on or off. For a specific group, sign into User Management>Group Management instead of the Account settings and follow the same directions.
- Audio: Just as you’d share your screen for slides, you can also share high-quality audio at your event with the Share Sound option and choose between mono and stereo (high-fidelity) audio. This advanced feature mirrors the benefits of the video playback tool by providing a professional and immersive experience. Simply share your screen from your Zoom Meeting and select “Share Sound” in the lower left corner. From there you can switch between various audio options.
Interactive management
- Polling: Want to hear what your audience thinks? Need to collect instant feedback during your event? Create a Zoom Meetings or Zoom Webinars poll (can be done in advance or live) to launch during your presentation (live polls must be created via the Zoom Web Portal). Download the poll results and review afterward or discuss with participants in real-time.If you plan to use a poll more than once, save it in the Poll Library for easy access. NOTE: only the original meeting host can edit or add polls during a meeting. If you’ve transferred the co-host role to another user, that person can only launch polls that were previously created.To launch a poll during an event, you’ll need to enable the Polls/Quizzes function first. Similar to Slide Sharing and other features, polling can be enabled for specific groups, all users, or for your own use. For the entire group, sign in to the Zoom Web Portal, access your Account Settings from the Account Management menu and click the Meetings tab. There you’ll see the Meetings Polls/Quizzes feature to enable.Once the poll has been created and the function is enabled, look for the Polls button within the meeting or webinar controls (depending on event type). If you created one in advance, select the poll you want to launch and the participants will be prompted to answer questions. Zoom Webinars poll results can be viewed by all panelists, co-hosts, and hosts, while Zoom Meetings polls can be viewed by the hosts and co-hosts only.
- Apps: Access your favorite apps directly in Zoom Meetings for some fun ice breaker or enhanced collaboration tools. Use the Discover tab of your meeting to browse the apps and then add the one(s) you want to use. Or visit the Zoom App Marketplace from your Zoom desktop client to search for available apps.
- Q/A: Similar to polling, the question & answer feature for Zoom Webinars allows attendees to ask questions and have the hosts or panelists answer them. Attendees can also upvote or answer one another’s questions. Once you’ve enabled Q&A from the In Meeting (Advanced) section in your account settings, it’s easy to launch your questions.
Monitoring your webinars

The Zoom Dashboard
It’s easy to put all your focus on your event’s visual assets or your on-camera appearance, but if your webinar suffers technical difficulties, it’s hard to recover. If you’re using Zoom on a Business or Enterprise license, Zoom Dashboard is your mission control center to monitor the health of your event in real-time and access valuable data and insight for future event planning.
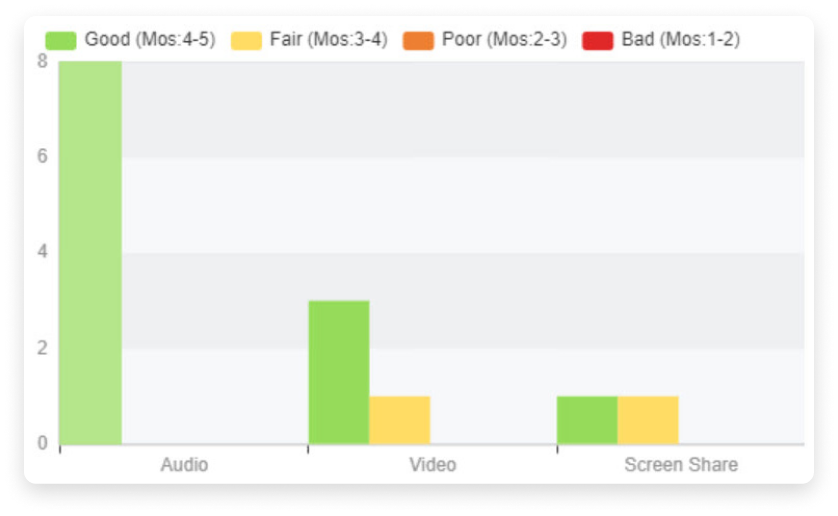
The Meetings and Webinars dashboards allow hosts to monitor participants’ video/audio experience, license types, and in-depth details around the quality of their connection. Specifically, the dashboard will track:
- Bitrate
- Latency
- Jitter
- Average packet loss
Select the meeting ID of the event you’re monitoring from the Live or Past meetings tabs in your dashboard, and there you’ll see detailed analytics relating to the overall health of your participants’ connections.
Maximize your recordings for the long-term

If you plan to send your webinar or meeting to attendees or teammates, or you just want to review it on your own, we recommend recording it to either the cloud or locally to your computer. Cloud recordings can be managed in the Zoom Web Portal while local recordings can be accessed via the Documents folder on your computer. If you need to change your default location for local recordings, look for Recordings in your Zoom client settings.
Once you’ve downloaded your event as a local recording, you can’t upload it to the Zoom cloud. Make sure to choose the cloud recording option if you want your recording to live in the cloud.
To edit your cloud recordings, log in to the Zoom Web Portal and find the recording you’re looking for. Under this setting, you can edit the name of the recording, trim the beginning or end of your cloud recordings, download the files, copy a shareable link to send to others, access viewing analytics, or delete your recording altogether.
To share a local recording with others, you’ll need to upload it to a third-party cloud storage app or content management platform. From your Zoom desktop client, you’ll find your recording under Meetings>Recorded tab. From there, you can upload the MP4 file into the third-party app.
When sharing cloud recordings, you have several options for viewer access. Within the recording’s page, click Share and you can choose if you want to share your recording publicly or keep it private.
You can also:
- Add an expiry date to your link
- Give viewers the option to download the video after viewing it
- Allow them to see an auto transcript
- Require an email address and name to view it
- Require a passcode before viewers can view or download the recording
Zoom is here to help

Zoom Meetings support
Want to learn the ins and outs of all the Zoom Meetings features? Check out our complete database of Zoom Meetings support articles, FAQs, release notes, tutorial videos, and troubleshooting guides.
Zoom Webinars support
For a detailed guide to using Zoom Webinars and a comprehensive list of features, our Zoom Webinars support articles provide a step-by-step approach to set up your event, invite attendees and panelists, and launch your webinar.
Zoom Event Services
Still need some extra help with your virtual event? Zoom Events Services offers event consultation, technical guidance, in-event support, and advanced technical production for your event from beginning to end.
Depending on the complexity of your event, our team of Zoom Events experts can meet with you prior to your event to discuss best practices, ideation, registration and ticketing recommendations, or go a step further and develop a run of show with technical support specifics. During the event, we can monitor your event dashboard, oversee the A/V production and content assets, and even provide advanced video and audio mixing equipment. We’re here to make sure you’re comfortable and prepared to launch a virtual event.
Learn more about our Zoom Events Services support plans to transform your event into a successful, impactful experience.
Elevate your marketing strategy with Zoom Events
Virtual events are here to stay. With opportunities to extend your brand reach, decrease operating costs, and engage audiences with inclusive and sustainable experiences, there’s never been a better time to host a virtual event and elevate your marketing strategy.
